Rusty Beaches Belgian Beer Stein - $20 SOLD!!!

This gorgeously colored beer stein was inspired by my brother-in-law Joeseph Henrie. His love for Belgian beer led us to make the perfect shape for holding in the flavor while persuading the foam to the top. Cheers! Food and dishwasher safe.
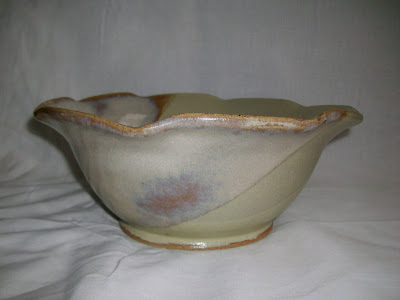
Amber Coffee - Medium Serving Bowl - $30 SOLD!!!

Absolutely beautiful finish with light amber, dark brown, and stunning flashes of blues and lavender. Food Safe. Microwave and Dishwasher safe.
Wiggle Collection - Cinnamon Sea Wave Medium Serving Bowl - $45 SOLD!!!

Amazing color combo of metallic green splashing into a deep cinnamon bowl. Interesting and eye catching. 8.5" wide by 4" tall. Food and dishwasher safe.
Wiggle Collection - Cinnamon Spice Large Mixing Bowl - $28 SOLD!!

Food Safe. Microwave and Dishwasher safe.
Oil Spot Oasis 10" Pie Plate - $45 SOLD!!!

This incredibly unique blue pie plate will be the conversation piece of your kitchen! Food Safe. Dishwasher, Oven, and Microwave safe.
Sandy Oasis Handled Mugs- Set of 4 - 8oz each - $60 SOLD!!!

Feel like you're at a beach house every morning while you sip coffee from one of these fabulous tri-colored mugs. Set of 4. Each mug is unique and includes hand pulled handles with my thumb print button at the bottom. Food Safe. Microwave and Dishwasher safe.
Wiggle Collection - Medium Sized Golden Serving Bowl - $25 SOLD

This beautiful wiggle bowl has Gorgeous golden colors accented with flecks of red and flashes of blue and white inside. Food Safe. Microwave and Dishwasher Safe.
Oasis Blue Tea Mug - 18oz - $15 SOLD!!!

Wonderfully elegant blue tea mug has an almost transparent look to it, with faint crackled look underneath. Food Safe. Microwave and Dishwasher safe.
Golden Red Tea Mug - 16oz - $14 SOLD!!!


Gorgeous golden colors accented with flecks of red and flashes of blue and white inside. Food Safe. Dishwasher and Microwave safe.
Pie Weight Beads- $7

These unique ceramic pie weights are used to keep pie crusts flat while baking. An age old technique for perfect pie crusts every time. Artist's stamp on each bead. 75 beads per package.
Piggy Bank - "Whiskey" - $45 SOLD!!!

Medium sized piggy bank. Foot to ear height: 6 inches, Tail to snout length: 6.5 inches. Cork included in sale.
 Toothbrush Holders - $12 each SOLD!!!

Dishwasher safe for easy cleaning
Available in either "Starry Night" or "alluRed"
Sand Oasis Serving Platter and Dipping Bowls - $75 SOLD!!!


Just over 12'' platter beautifully colored with sandy and blue decorative stripe with green accents comes complete with two small 4.5'' bowls great for parties and family get-togethers.
Black'n'Tan Tea Mug - 15oz - $18 SOLD!!!

Food Safe. Microwave and Dishwasher safe.
Ghost Willow Cut Lip Vase - $45 SOLD!!!

This 6" vase is gorgeous and completely unique. All raku pots are extremely labor intensive and difficult to achieve predictable results. The beauty of these pots is the random flowing visual effects of nature.
Not food or dishwasher safe.
Wiggle Collection - Shallow Serving Dish - $35 SOLD!!!

This beautiful serving dish has unique colors that complement any kitchen. At 9.5" wide by 2.5" tall, this functional conversation piece will satisfy every guest, and every entree!
Food Safe. Oven, Microwave and Dishwasher Safe.
Wiggle Collection - Small Cinnamon & Spice Serving Bowl - $20 SOLD!!!

Dark Cinnamon tones are elegantly complemented by flashes of purple, white, and blue, inside this small serving bowl. 6.5" Wide by 2.5" tall. Food Safe. Microwave and Dishwasher Safe.
Sandy Oasis Handled Mug - 12oz - $18 SOLD!!!

Fabulous tri-colored mug with thumb print handle. Food Safe. Microwave and Dishwasher safe.
10" Blue drip Casserole with Button Handles - $45 - SOLD!!!

Food Safe. Dishwasher, Oven, and Microwave safe.
8.5" Outer Space Shallow Serving Dish - $25 SOLD!!!

Food Safe. Dishwasher, and Microwave safe.
Set of 2 Foam Overflow medium sized Mugs - $30 SOLD!!!

Food Safe. Dishwasher, and Microwave safe.
Medium Agateware Bowl - 7.5" wide 4" deep - $35
SOLD!!!

Food Safe. Dishwasher, and Microwave safe.
Medium Agateware Bowl - 8" wide and 4" tall - $35
SOLD!!!

Food Safe. Dishwasher, and Microwave safe.
Wiggle Collection Medium sized Agateware Bowl - 7.5" wide and 4" tall - $40 SOLD!!!

Food Safe. Dishwasher, and Microwave safe.
Lg Piggy Bank - Sgt. Pepper 2 - $45 SOLD!!
 Lg Piggy Bank - Molly - $45 SOLD!!
 Medium Piggy Bank - Hughey - $35 SOLD!!!
 Small Serving Bowl - Yellow with flashes of Pink and White rim and drips - $25 SOLD!!!

Food Safe. Dishwasher, and Microwave safe.
10" Cinnamon Pie Plate with cream rim and violet highlights - $45 SOLD!!!

Food Safe. Dishwasher, Oven, and Microwave safe.
Large Serving bowl - blue and turquoise - $40 SOLD!!!

Food Safe. Dishwasher, and Microwave safe.
Black and tan 10" pie plate $45 SOLD!!!

Food Safe. Dishwasher, Oven, and Microwave safe.
Lg Piggy Bank - Desmond- $45 SOLD!!
 Key/Jewelry Bowls - 5" x 1.5" in pink and blues - $40 SOLD!!

Food Safe. Dishwasher, and Microwave safe.
Medium Lidded Bean Pot - $50 SOLD!!!

Food Safe. Dishwasher, Oven, and Microwave safe.
Crying Piggie banks - 2 small and 2 extra small - Lot of 4 - $55
Misty, Brooke, Aquanetta, and Babble (Babs) SOLD!!!
 Medium Agateware Bowl - $50 SOLD!!

Food Safe. Dishwasher, Oven, and Microwave safe.
Lg Piggy Bank - Rocky - $45 SOLD!!
 10" Stardust Pie Plate - $45 SOLD!!!

Food Safe. Dishwasher, Oven, and Microwave safe.
Cinnamon & Mint Spoon Jar with matching Spoon Rest - $30 SOLD!!!

Display your kitchen utensils in this lovely spoon jar for your counter. Set comes complete with matching spoon rest for your stove top. Food safe. Dishwasher safe for easy cleaning!
Sandy Oasis Tea Mug - 16oz - $25 SOLD!!!

Amazing blue color with sandy brown drips. Makes you feel like you're sipping tea at the beach! Food Safe. Microwave and Dishwasher safe.
Horsehair Vase SOLD!!!

This 6.5" horsehair vase is gorgeous and completely unique. All raku pots are extremely labor intensive and difficult to achieve predictable results. The beauty of these pots is the random flowing visual effects of nature.
Not food or dishwasher safe.
Cinnamon Sea Wave Spoon Jar Set - $60 -
SOLD!!!

Matching set of Spoon Jars. Food Safe. Dishwasher safe for easy cleaning!
Wiggle Collection - Cinnamon Sea Wave - Nesting Snack Bowls - $45 SOLD!!!

Small set of nesting bowls perfect for snacks or side dishes. Dishwasher and Microwave Safe. Food Safe.
Oasis Pie Plate - 10" SOLD!!!
This stunning pie plate takes on the look of being underwater. Food Safe. Oven microwave and Dishwasher safe.
SET OF 3 - Wiggle Collection - Nesting Bowls - Cinnamon & Spice - $65 SOLD!!!


This gorgeous set of nesting bowls includes 3 serving bowls in the following sizes:
Large - 9.5" wide by 3" tall.
Medium - 7.5" wide by 3" tall.
Small - 6" wide by 3" tall.
Dark Cinnamon tones are elegantly complemented by flashes of purple, white, and blue, inside bowls. Bowls stack perfectly together for display on counter, or easy storage. Food Safe. Dishwasher and microwave safe.
Sea Foam Tea Mug - 20oz - $15 SOLD!!!

Warm your hands and your belly while sipping tea out of this lovely handle-less Tea Mug. Transparent Sea Foam Green with swirl up side of mug. Food Safe. Microwave and Dishwasher Safe.
Wiggle Collection - Small Light Teal and Black Freckled Serving Bowl - $20 SOLD!!

7.5" Wide by 3" tall. Bowl has speckles and slight texture inside. Food Safe. Microwave and Dishwasher Safe.
Wiggle Collection - Cinnamon Sea Wave Nesting Bowl Set of 3 - $65 SOLD!!!
Brilliantly colored, this set of 3 nesting bowls add interest and beauty to any kitchen decor. Food Safe - Microwave and Dishwasher Safe.
Wiggle Collection - Golden Sunrise Large Serving Bowl - SOLD!!!

Food Safe. Dishwasher and microwave safe too.
Small Dessert Bowl - $6 SOLD!!!

Food Safe. Dishwasher and Microwave safe.
Medium sized Batter Bowl - $20SOLD!!!

Food Safe. Dishwasher and Microwave safe.
Black'n'Tan Tea Mug - 20 oz - $20SOLD!!!

Elegant colors. Food Safe. Dishwasher and Microwave safe.
Oasis Gravy Pitcher - 16oz - $18SOLD!!!

Food Safe. Dishwasher and Microwave safe.
Wiggle Collection - Amber Coffee- Medium Serving Bowl - *$15 SOLD!!! 
Beautiful amber and dark chocolate serving bowl with flashes of blues and lavender. Stunning colors. Price lowered due to minor glaze defect on bottom outside of bowl (slightly rough, but does not interfere with the integrity of the bowl). Food Safe- Microwave and Dishwasher safe.
Wiggle Collection - Amber Coffee- Medium Serving Bowl - *$15SOLD!!!

Beautiful amber and dark chocolate serving bowl with flashes of blues and lavender. Stunning colors. Price lowered due to minor glaze defect on bottom outside of bowl (slightly rough, but does not interfere with the integrity of the bowl). Food Safe- Microwave and Dishwasher safe.
Small Blue and Sage Bowl - $15 SOLD!!!

Food Safe. Microwave and Dishwasher safe.
Piggy Bank - "Puddin" - $20 SOLD!!


Small sized Piggy Bank. Tail to snout length: 4.5 inches, foot to ear height: 5 inches. Cork included in sale.
Small Juice Cup - 6oz - $8 SOLD!!

Food Safe. Dishwasher and Microwave safe.
Small Mug - 11 oz - $5 SOLD!!

Food Safe. Dishwasher and Microwave safe.
Blushing Bowl - 18 oz - $10 SOLD!!

Cereal bowl. Food Safe. Dishwasher and Microwave safe.
Small Goblet - 12 oz - $10 SOLD!!

Food Safe. Dishwasher and Microwave safe.
Pretty in Pink Blushing Mug - 12 oz - $ 8 SOLD!!

Food Safe. Dishwasher and Microwave safe.
Medium Serving Bowl - Sage - $22 SOLD!!

Microwave, Oven and Dishwasher safe!
Juice Cup - 8 oz - $8 SOLD!!

Food Safe. Dishwasher and Microwave safe.
Square Bottomed Mug with Handle - 11 oz - $10 SOLD!!

Food Safe. Dishwasher and Microwave safe.
Blushing Mug - 14 oz - $10 SOLD!!

Food Safe. Dishwasher and Microwave safe.
Piggy Bank - "Shy-Boy" - $35 SOLD!!!

Medium sized Piggy Bank. Foot to ear height: 5.75 inches, Tail to snout length: 5 inches. Cork included in sale.
Piggy Bank - "Honey" - $30 SOLD!!

 Small sized Piggy Bank. Tail to snout length: 5 inches, Foot to ear height: 5.25 inches. Cork included in sale.
Wiggle Collection - Reddish Gold Medium Sized Serving Bowl - $25 SOLD
Small sized Piggy Bank. Tail to snout length: 5 inches, Foot to ear height: 5.25 inches. Cork included in sale.
Wiggle Collection - Reddish Gold Medium Sized Serving Bowl - $25 SOLD
 Beautiful golden hues accented by flashes of grey-blues. Sandy look gives this Beautiful bowl a very earthen visual effect.
Small Desert Bowl - Speckled Turquoise - $10 SOLD!!

This cute little desert bowl is just the perfect size for a single serving of your most favorite ice cream! An interesting shade of teal with eye catching white speckles. 4.5" wide by 2.25" tall.
Food Safe. Microwave and Dishwasher Safe.
Deep Dish 9" Pie Plate - $40 SOLD!!!
 Dishwasher, oven and microwave safe.
Midnight Oasis Medium Serving Bowls - Set of 2 - $45 SOLD!!
 Deep midnight blue serving bowl set with black undertones.
Medium Sized Serving Bowl - $20 SOLD!!
 Dark Midnight Blue Serving Bowl has lighter blue rim with hints of tan. Lovely and interesting color blends- Microwave and Dishwasher safe.
Wiggle Collection: Spring Green & Opalescent Medium Serving Bowl - $16 SOLD!
 Microwave Oven and Dishwasher safe!
Piggy Bank - "Cocoa" - $25 SOLD!
Microwave Oven and Dishwasher safe!
Piggy Bank - "Cocoa" - $25 SOLD!
 Small sized piggy bank. Cork included in sale. Tail to snout length: 4.5, foot to ear height: 5.75 inches tall. Cork included in sale.
Large Handled Mug - 16 oz - $12 SOLD!
Small sized piggy bank. Cork included in sale. Tail to snout length: 4.5, foot to ear height: 5.75 inches tall. Cork included in sale.
Large Handled Mug - 16 oz - $12 SOLD!
 Food Safe. Dishwasher and Microwave safe.
Elegant Mug - 11 oz - $10 SOLD!
Food Safe. Dishwasher and Microwave safe.
Elegant Mug - 11 oz - $10 SOLD!
 Food Safe. Dishwasher and Microwave safe.
Earthen Tones Nesting Bowl Set - $60 SOLD!
Food Safe. Dishwasher and Microwave safe.
Earthen Tones Nesting Bowl Set - $60 SOLD!


Food Safe. Dishwasher Oven and Microwave safe.
Copper Green Decorative Vase $20 SOLD!
 Decorative vase, approximately 7 inches tall. Lovely copper tones with flashes of green. Bottom and inside are black. Non-Food Safe.


 Please email
 Beautifully colored Horsehair vase. 4.5" tall. All raku pots are extremely labor intensive and difficult to achieve predictable results. The beauty of these pots is the random flowing visual effects of nature. Not food or dishwasher safe.


